On July 29, Microsoft finally took the wraps off Windows 10, the latest iteration of the Windows OS. It was delivered as a downloadable update to existing Windows 7 and 8.1 users.
The software was met with great reviews across the board, and its likely many Mac users would want to get their hands on it too. While Microsoft doesn’t officially offer support for Windows installations on Macs, you can install it yourself using the following guide.
You’ll need the following:
- A secondary computer running Windows 10
- An 8GB USB Flash Drive
- A speedy internet connection
If you only want to try out the OS, install the trial version and uninstall it after the 30-day period is over. Otherwise, you’ll need to purchase a separate license for it.
Upon switching the PC on, you’ll be presented with the option to either boot into the default Mac OS X or Windows 10. If you already have dual-boot configuration up and running with Windows 7 or 8.1, you can update your Windows installation from within the OS.
How to Download Windows 10
Step 1: For this, you’ll need to use your secondary Windows PC. Plug in the flash drive and download the
Windows 10 Media Creation Tool from Microsoft’s website. There are two options to choose from;
32-bit and 64-bit. If you don’t have an idea about computer architectures, download the 64-bit version just to be safe.
Step 2: Install and Run the Media Creation Tool, and select "Create installation media for another PC" when presented with the option, then click Next.
Step 3: Select the Edition, Language and Architecture in the subsequent screen and press Next. In the Architecture section, select 64 bit, as all new Macs support that configuration.
Step 4: Initiate the download after selecting to save the installer as an ISO file. While ISO files are meant for burning optical media disks, we’ll show you how to “burn” the file to a flash drive. There’s already an option to create a bootable flash drive using the tool, however, we ran into compatibility issues with the option.
Step 5: Select the location you wish to save the downloaded ISO file at. It is recommended to directly save it onto the USB flash drive. The ISO file is several gigabytes in size so it may take a while depending on your internet connection. Once the file is downloaded, eject the flash drive and insert it into the Mac you intend to install Windows 10 on.
You’ll no longer need the Windows PC for the remainder of the process.
How To Setup Your Mac For The Installation
Step 1: Access the flash drive from the Mac. Copy the Windows 10 ISO file from the flash drive onto the Desktop. Before proceeding further, ensure that there aren’t any additional drives connected to the Mac.
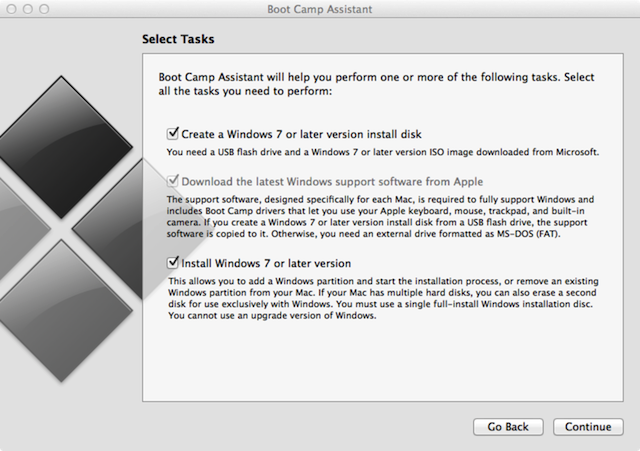
Step 2: Press Command+Space to bring up Spotlight. Search for and open Boot Camp Assistant. Press Continue once the application starts up.
Step 3: Check the following: Create a Windows 7 or later version install disk, Download the latest Windows support software from Apple and Install Windows 7 or a later version. Then proceed to Continue. Boot Camp will automatically detect the Windows 10 ISO placed on the Desktop. If it fails to do so, simply click Chooseand direct the software to the location of the ISO file.
Step 4: Verify all the settings and then click Continue. You’ll be presented with a warning; accept it and the software will start downloading the latest Windows support software, which usually entails the drivers and compatibility files.
Step 5: Boot Camp Assistant will redirect you to a screen which will allow you to choose the partition size for the Windows 10 installation. The slider will allow you to adjust the size. Windows 10 takes up around 20GB of install space, so ensure that you leave an ample amount of storage for files and program installs. Once set, this value cannot be changed. Once that’s done, click Install. Boot Camp Assistant will partition the Mac’s drive and restart the Mac automatically once it’s done.
How To Install Windows 10 On a Mac
Step 1: As the installation media has been created on the flash drive, the Mac will automatically boot with the USB to initiate the Windows 10 install process. Select the language, currency format, keyboard settings and time, then click Next. If due to some error, the Mac doesn’t automatically boot from the flash drive, don’t fret. You can boot from the flash drive by holding the Option key upon boot, and selecting the boot from flash drive option, once prompted.
Step 2: If you’re in possession of a Windows 10 key, enter it on the subsequent screen. If not, then simply skip the step. You’ll be prompted to confirm the edition of Windows, with a choice between Home and Pro. Select the version and press Next.
Step 3: The Windows install process will present you with all partitions, one of which will clearly be marked BOOTCAMP. This is the partition you need to select. Click it and press Format. Press OK on the warning prompt, followed by Next.
Step 4: The rest of the Windows install process is automatic. Depending on the capabilities of your Mac, the whole process may take 10 to 20 minutes to complete. Upon completion, the Mac will automatically boot to the Windows installation.
Step 5: The first login will be followed by a Boot Camp installation message. Complete the remaining Boot Camp installation process via the Wizard and then reboot the computer.
That’s it. Now, you’ll have a working dual-boot installation of both Windows 10 and Mac OS X on the same system. To choose which OS to boot into during the boot process, simply hold the Option key after the Apple startup sound. You’ll be presented with an option and can make your selection there.
In order to change the default boot OS, access the Boot Camp control panel in Windows or the Startup Disk in System Preferences on Mac OS.
To uninstall Windows and revert the changes, run the Boot Camp assistant in Mac OS X.


An icon in the systray is created by Child Lock at start-up, which has four buttons displayed in the main window. If you wish to automatically lock the application, click Auto Lock, if it hasn’t been active in the last 10 minutes. Double-click the tray icon of Child Lock and click Cancel in the main window, if you wish to cancel this task.